Showing posts with label nursery. Show all posts

Thursday, June 30

Framed Fabric - Nursery Artwork


Today I changed my mind on the artwork for BG's room. I took out the Peter Rabbit illustrations, and put in pieces of the various fabrics I picked out for her room. I think when she's a little older, I'll put the Peter Rabbit pictures back in, but while she's so young and still developing her eyesight and taking in the world around her, I wanted to keep it simple, and went with the warm, familiar colors and patterns of the same fabrics she'll see when she's in her crib.

And, I finally got the frames hung on the wall! I like the arrangement of three by three. They aren't perfect, but that's okay. After all, I said I wanted a whimsical nursery :)

Monday, June 27

Mobile of Garden Friends


Here is a simple little project that took me all of thirty minutes start to finish. I ran across these adorable painted, wooden garden critters -a pretty butterfly, a smiling bumblebee, a happy frog, a colorful dragonfly, and an adorable snail (Hubs' pick)- at Jo Ann a few weeks back, and decided they would work perfectly as the focus of a little mobile idea I had brewing. I bought an embroidery hoop and some sheer ivory ribbon, and once I finally got out my glue gun last week, I went to town. First I cut five ribbons, two about twelve inches and three about fifteen inches long, and glued each critter to the end of a ribbon. Then I tied them (evenly spaced) around the plain wooden hoop, tied five more ribbons in the spaces, tied one big knot at the top, and voila - a mobile! It cost less than ten dollars for supplies and it's just what I wanted to hang above the changing table. Perfect for a little gal's garden room :)

Saturday, June 18

Craft Projects for Baby's Room: A Memory Board and Shelves

I have been busy this weekend! Not feeling well, still - UGH! - so sticking close to home and puttering away on these baby room projects as I find the energy.

I made a memory board out of an acoustic panel!


Here's how I did it:
I removed the fabric we had on there (and in the process got a bunch of fiberglass slivers in my fingers - ouch!), then recovered it with one of BG's bedding fabrics, using a staple gun to secure it. Then I started attaching the ribbon. I worked from the middle outward in one direction, spacing the ribbons four inches apart and carrying about an inch and a half onto the back on each end, using a glue gun. Next, I did the same thing with the ribbons going in the other direction, weaving them in and out of the first layer of ribbon and gluing them the same way. Once I finished attaching the ribbons, I glued down each intersection. Then I glued a button on top of each intersection. I used a variety of buttons - shimmery simple round ones, flower-shaped ones, and fun ladybug ones. Here's a close-up of the buttons:


The other project I've wrapped up is a pair of flower shelves. I think they look pretty cute, and I like how they're a little more artistic and in keeping with the flowers in the fabric. Here they are:


I think it's finally about time to start hanging up these things in BG's room. It is so much fun creating a room from scratch! :)

Simple & Affordable Nursery Art!

I just have to say, if you think you can't decorate a nursery or child's room (or your own room, for that matter) on a very strict budget, you are mistaken! I am having so much fun coming up with ideas and utilizing all my bargainista know-how to make BG's room a special place. It is turning out so much cuter than some room-in-a-bag you find at the baby store, and so much cheaper! And there's so much more thought and love behind it.

Ok, moving on to the reason for this post. Yesterday and today, I made some adorable art for BG's room - eleven pieces to hang up, in all - and only spent $11.65!

The first piece is a framed picture that Hubs and I found online and printed out on photo paper in a 5x7. I believe it's from an old Christmas card. I found a pretty black wooden frame at the dollar store, and voila! It's going to hang right next to the 12x12 framed name art I made (see last post).


The idea for this piece of art came about last week, when we finalized our choice of BG's middle name. We chose Liviya, which means "brave lioness," and then realized that, when paired with our last name which means "lamb," it alludes to the scripture describing the peace Christ will bring to the earth ('when lion and lamb will dwell together,' 'Lion of Judah/Lamb of God,' etc.). Hubs and I had an "ah-ha!" moment and decided we needed to find and frame a picture of a lion and lamb for BG's room, as a representation of two of her names.

The other ten pieces of art are from one of my all time favorite children's books: Beatrix Potter's Peter Rabbit. This idea is a spin-off of my original nursery concept to frame prints from Arnold Lobel's Frog & Toad books. I decided that with the garden theme that BG's room is taking on, Peter Rabbit would fit better. I scooped up a copy of the book at Goodwill the other day for 65 cents (score!) and, while this was totally against my book-loving nature, and it pained me, I cut out the pages of beautiful, classic artwork and trimmed them into 3.5x5 inch pieces to frame. (I justified this major book faux pas by reminding myself that I already own three copies of Peter Rabbit in various forms, and there were a handful of other copies on the shelf at Goodwill as well.) Then I headed to the dollar store for frames. They have some really nice new ones in stock, and I got ten distressed gold frames that are going to look darling on her wall. I cut carefully, dusted the glass delicately, framed precisely, and I'm done! Here are two photos of what I did - they are terrible quality, but my camera is terrible (we are begging for a new one on our baby registry):


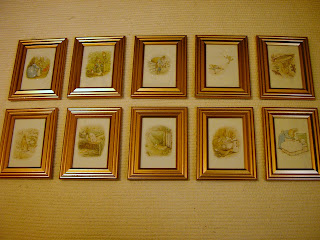
I haven't decided if I'm going to hang them in two rows of five, or take one away and do three rows of three. I can't wait to hang them up, they turned out even better than I hoped! And the gold color looks awesome with the cream and green walls in BG's room.
Another project down, many more to go...

Wednesday, June 8

Remodeling Update: We're Done!

We are finished! Hubs wrapped up the remodel last night with the closet system installation, which means the whole project took just under one month. Fastest remodel yet. The floor was pretty easy to put in once we got the hang of it - I think it was probably only four hours of actual working on it to get it done. It looks beautiful. And this is our first remodel that we've been able to finish with trim; it gives the room such a nice clean look. It makes me excited to get trim into our bedroom and kitchen finally.

The only thing that still needs to be done is baseboards, and we will get to those when the warm weather returns (for good outdoor painting conditions). We are both so happy to be done and getting our house back. I can't wait until this evening; we're going to set up the crib and move BG's dresser out of the living room and into her room!

I've so enjoyed puttering around in her room today, getting it set up. Now I can start decorating the walls and adding the bedding to the room as my mom and I sew it.
Here are a few photos of the finished project - I'm so proud of my husband!


Saturday, June 4

Sneak Peek of Baby's Room...

We are having the most gorgeous day of the year. I got the window and door trim and chair rail painted for BG's room. Hubs is going to install them later. We must be on the homestretch; finishing touches are going in!

Here is a little sneak peek of the vision for Baby's room, coming together - paint colors done, painted chair rail in it's spot, floral fabrics for her bedding draped over the Jenny Lind crib... I love it and can't wait til it's ready for Baby!!! :)


And just for the record, all the time we spent choosing JUST the right shade of blue/green for the walls, so it would draw out the color in the fabric - it was worth it. Check out this perfect match:

Thursday, June 2

Glider Rocker for Baby's Room

This is a little project that has turned out even easier than I thought it would. I bought this glider rocker at a thrift store for $17 back in March or April:


I was planning to re-cover the inner foam cushions with a home decor fabric that goes with the color scheme in Baby's room.
As my due date approaches little by little, and my sewing table isn't really usable while we remodel, I've been wondering what I'll do for cushions. I read something the other day about using the outdoor chair cushions that Peri 1 and World Market sell. I thought this sounded like a great plan, but these cushions run about $40 each, or more.
Well, Hubs and I were at IKEA over the weekend and I passed these cushions in their summer outdoor area, and they were on close out for $12.99 each!


They had less than ten left, all in the yellow and pink plaid, so I bought two just in case they would work. Took them home, put them on the glider rocker, and they fit perfectly! So there's one less project to take on in case Baby arrives earlier than expected, or I get hung up on another project for her room. I love finding great deals :)

Wednesday, April 20

A Garden Room for Baby V

I love looking at pretty things, and the fabric I've picked for Baby Girl's room is so pretty! It makes me smile, and cheers me up, and I wanted to share it here.

This is the fabric for the crib skirt, and the inspiration for the whole room. I'm going to frame a piece for the wall as well:


And a close-up:


This is the home decor fabric I chose to recover the glider cushions:


Both fabrics have a creamy colored background, not white. I love the spring green and warm rich reds, oranges, and browns. I found another calico print that I think I'm going to make the bumper out of. It's a warm, muted orange with red ad cream leaf accents. Matches perfectly. There is a tiny floral printed calico in a warm green that sort of goes, but I'm not sold on it:


I still want to avoid an overly "themey" room. What I've been doing is buying things I like and that coordinate, and trusting that it will come together. I read that if you create a room you would have loved as a child, you can't go wrong. Well, it is coming together; over the weekend I realized that V's room is taking on a garden theme! I would have loved it as a girl (after all, my favorite birthday party we ever put on was a garden/flower theme. Hard to explain, but it was so much fun - inspired by an American Girl Magazine idea). See, we have floral prints and frogs, and I've planned all along to frame and hang this watercolor that my niece painted for me and Baby V:


Perfect, right? Hubs wants to make a mobile of birds or butterflies. And the creativity keeps flowing, stay tuned... :)