Showing posts with label dessert. Show all posts

Tuesday, July 24

Pumpkin Pie Ice Cream {Dairy-Free, Vegan}

Pumpkin Pie. Coconut milk. Ice cream. Warm "autumn" spices.

I can't even pick which of those four things is my favorite, I love them all. So, when all four were combined into an incredibly tasty, cool dessert during the heat wave we experienced earlier this month, I was a happy camper.
And it explains why I have not one photo, not even a cell phone pic, of this frozen treat. We devoured each serving in such a happy daze of ice cream bliss, that no one thought to get the camera. We even made a second batch recently - no physical evidence of that either.
Enough said?
Try this ASAP!  :)

Homemade [Dairy Free, Vegan] Pumpkin Pie Ice Cream

What you need:

  • 2 cups pumpkin puree - I used canned Libby brand. Trader Joe's is another good option
  • One can full-fat coconut milk - approximately 2 cups
  • 1/3-1/2 cup pure maple syrup (sweeten to your liking)
  • 1-2 teaspoons each: cinnamon, nutmeg, cloves, allspice, ginger or 1-2 TB pumpkin pie spice (season to the flavor intensity you prefer)

What you do:

Pour pumpkin puree and coconut milk into blender or large food processor, and mix for 20-30 seconds to combine well. Drizzle in maple syrup through the top while it continues to mix. Stop machine, add in spices and blend another 20 seconds to ensure all the flavors are evenly distributed.
Pour into ice cream maker and process for 25 minutes (or otherwise noted in instruction manual).
Enjoy!

Tuesday, July 3

Red [Brown] & Blue Berry Muffins!

Just in time for the 4th of July, here is a recipe for Red and Blue colored muffins, free of gluten, dairy, eggs, soy, refined sugar, legumes, and very low in grains...


These muffins are delicious. Soft, moist (though a bit crumbly) in texture, the chestnut flour gives them a warm nutty flavor while the blueberries sweeten and the raspberries give a little tang. They are an achievement I'm most proud of!


I have tested this recipe three different times, changing at least one ingredient each time. The last test was done using mini-cupcake liners and my new mini cupcake tin I purchased in prep for Victory's first birthday.
They turned out well each time, which tells me that they are nearly foolproof muffins. It helps (and somehow feels more decadent) to eat them with a spoon in a little bowl; this way you're sure to get every last crumb in your mouth too!

This version I'm sharing with you was my third experiment. It uses the highest ratio of Chestnut flour, I'm guessing this is why these were the darkest in color of the three versions. It also uses the lowest amount of grains, so that's why I picked it to share. If you're interested in the other two (just as delicious) versions using rice flour and tapioca flour, comment and I will post them.

This recipe came about a few weeks back, when there was literally nothing to eat in our kitchen but a few ingredients. A few gluten free flours I wanted to get rid of, frozen berry blend mix from Costco, and part of a bag of Chestnut flour leftover from my birthday Carrot Cake Cupcakes. I pulled my Flying Apron Baking Book off the shelf and found a recipe for "Maple Berry Muffins." I modified it to be as Primal, grain-free and low-sugar as possible, and three baking sessions later, here are these muffins.

These taste so good, and look so pretty, that they may be making an appearance at Victory's 1st birthday party next month, complete with fresh blackberries from our garden! I hope you enjoy them as much as we have (that includes me, Hubs, my mom, our friends, our friends' kids, our neighbors... they are crowd pleasers)!


Red (Brown) & Blue Berry Muffins

Makes 10-12 traditional size muffins, 24+ mini muffins

What you need:

1 1/2 cups chestnut flour, such as Dowd & Rogers
1/2 cup sorghum flour
1/2 tsp baking soda
1+ cup water
1/2 tsp apple cider vinegar
1 tsp vanilla extract
1/3 cup grapeseed oil or olive oil
1/3 cup pure organic maple syrup OR 1/4 cup maple sugar
1/2 tsp cinnamon
1/4 tsp ginger, optional
1/4 tsp sea salt
1/2 cup fresh/frozen raspberries
1/2 cup fresh/frozen blueberries

*I have been reading Michael Ruhlman's Ratio, and I have to say, it pains me to list out these measurements for you, knowing that if they were weights instead, you'd be essentially guaranteed a perfect muffin. My blog may turn into a recipe-by-ratio, baking-by-weight destination in the future, because I am really loving that concept. In the meantime, go with your gut. Baking without gluten really isn't so intimidating or risky, just pay attention to the texture of your batter and have fun! That is what it's really about :)

What you do:


Preheat oven to 365 degrees. Prepare your muffin tin, using festive paper liners.
In small-medium mixing bowl, combine dry ingredients and set aside.
Using stand mixer, whisk together liquid ingredients on low until blended.
Slowly add dry ingredients to liquid mix, on medium speed, until smooth. Add water if mixture seems to need more liquid. Batter will be runny, similar to pancake batter, or a slightly watery brownie batter.
Scoop 1/4 cup batter into each muffin cup. Depending upon how much water used, you will get 10 to 12 traditionally sized muffins.
Drop berries (can be frozen still) on top of batter in each muffin cup.
Bake until golden and tops are slightly firm to touch. It took 20 minutes for my traditional size muffins to bake (check at 15), and less than 10 minutes for the mini muffins (check at 5 minutes).

Note: Don't stress too much about getting them perfectly done. The beauty of baking without eggs is that even if your muffins turn out to be not quite done, they won't hurt you!


Enjoy! (I know you will!)
These would be delicious set on top of a small bowl of coconut milk ice cream... Excuse me while I steal away to my kitchen to see if I have what's needed to make that happen ;)

Have a festive 4th of July with family, friends, fireworks, or whatever else helps you celebrate all that our nation's freedom has given you. We are so blessed to live in the Land of the Free and the Home of the Brave. Happy birthday America!

Saturday, June 9

California Summer Avocado Pie

Today I am featuring a recipe from an outside source: the above pictured California Summer Avocado Pie via the  California Avocado Commission. It comes from their website, avocado.org. I got their monthly email this week, and it is chock full of summer recipes using beautiful California Avocados. Don't worry, you can be in the loop too! Sign up for their emails and check out more recipes here.

Source: avocado.org
Okay, does this summer pie not look absolutely decadent and creamy - and yet also light and refreshing? The perfect treat for the summer ahead- reward yourself after a day of hard work in the yard, or share with friends at an afternoon BBQ. Whatever the occasion, with the right substitutions this pie won't hurt you; it's full of good things!

First, let's establish a fact: Avocados are wonderful. You can cut one open and snack on it in slices or with a spoon, just plain like you would any other fruit. Make guacamole in minutes (delicious on top of a burger or chicken) by mashing one with a bit of water -or lime juice if you can eat citrus-, minced jalapeno, and a dash of salt. Avocados are a lovely and satisfying replacement for dairy in your diet - they add smooth, cool flavor to spicy Mexican food and provide a delicious creamy topping to burgers ... they thicken and enrich the texture of smoothies... Avocados make all sorts of desserts, even pudding! (Have you seen this tip before? Blend avocado, banana, and cocoa powder, and you've got chocolate pudding that's the perfect texture, nutritious and free of gluten, dairy, eggs and sugar!)

Best of all, avocados give you a healthy dose of anti-inflammatory, good fats. For this reason, avocados have been a God-send to me while I've been exclusively breastfeeding and experiencing occasional malabsorption issues from UC flares.Thank you, avocados! Read more about the nutritional benefits of these green beauties here: Alligator Pear Benefits.

Avocado Pie


I won't write out the ingredients or full recipe, because they are quite simple and listed clearly - just follow the link to the recipe. However, I am thinking the recipe needs just a few tweaks to make it Paleo - here are my suggestions:
  • Replace sweetened condensed milk with full-fat coconut milk
  • Lime juice and zest could be more delicious than lemon!
  • You can omit the graham-cracker crust altogether and pour the avocado mixture right into a glass pie pan or individual ramekins, and rename this "Avocado Custard" :)
  • or, make a Paleo-approved crust. You can make up your own very easily by trying different ingredients. One option is to blend coconut oil, almond or hazelnut meal, and maple syrup until you have the right consistency, pack mixture into pie pan, bake for a couple minutes to crisp and brown.
  • Nix the whipped cream
  • Garnish with nuts if desired and lime zest curls for a pretty decoration!
Now it's time for pie :)

Sunday, June 3

Birthday [Carrot Cake] Cupcakes

Thursday was my birthday, and I made myself a special treat. Carrot cupcakes. Free of grains, gluten, dairy, eggs, soy, almonds, refined sugar...
This was my first experience with chestnut flour - baking or eating - and I must say, it will definitely not be my last. (I'm glad I signed up to get a small bag of it every couple of months through Amazon.com Subscribe & Save!) The cupcakes turned out moist, soft, and cinnamon-y delicious. Chestnut flour has swag.

I frosted the cupcakes with a quick glaze-style icing I made from palm shortening, shredded coconut, maple syrup, local honey, and coconut oil. I spooned that on while it was still liquid, then topped them with leftover grated carrot and organic dried coconut flakes and left to set.
These were good by themselves, better enjoyed with a cup of coffee, and best with a bowl of coconut ice cream on the side!
The recipe made ten cupcakes, and it was the perfect amount to share with my husband and enjoy my birthday. I ate more than half of those ten in about twenty-four hours. It was my birthday and I indulged.


I saw the recipe featured last month at Brittany Angell's gluten-free, dairy-free site Real Sustenance, and bookmarked it for my special day. If you have never checked out Brittany's blog, head over there now and look at her recipes. I have made two of them now, these cupcakes and the Samoa cookies (original recipe). She is very talented and I'm so glad to have found her blog!

I made the cupcakes according to Brittany's recipe, with a few ingredient changes, less sweetener, and a misstep in mixing. It is a forgiving recipe, because they still turned out great! I give her all credit, however I only will list the ingredients I used and the steps I took to make these cupcakes.


[Grain-Free, Gluten-Free, Dairy-Free, Egg-Free, Soy-Free, Almond-Free]

Carrot Cake Cupcakes

Recipe credit: Brittany Angell, RealSustenance.com


What you need:
  • 1/4 cup natural applesauce (no sweeteners added)
  • 1/2 cup coconut milk
  • 1/4 cup grapeseed oil
  • 1 teaspoon gluten-free, alcohol-free vanilla extract
  • 1 1/4 cup Chestnut flour
  • 1 tablespoon cinnamon 
  • 1/4 cup Sucanat
  • 2 teaspoon baking powder 
  • 1 cup washed, peeled, grated organic carrots (I minced mine in the small food processor)
  • 1 teaspoon apple cider vinegar*
What you do:

Preheat oven to 325 degrees.
Line muffin tin with 10 paper liners.
Measure wet ingredients (applesauce, coconut milk, grapeseed oil, vanilla, and vinegar) into a large bowl, stir together to combine.
Add in the dry ingredients (chestnut flour, cinnamon, sucanat, baking powder) and blend with a spatula. Pour in grated carrots and gently fold together until batter is evenly mixed.
Scoop the batter into muffin cups and place into the oven. Bake for 30 minutes.
(Cupcakes will be finished when toothpick comes out clean.)

These cupcakes are delicious. It was fun sharing them and hearing the reactions - "full of flavor," and "If I hadn't been told already that these are gluten-free and dairy-free, I wouldn't have known!" "Yummy!"

I'm happy to report to you, grain-free does not mean delicious dessert free. You can come up with a special birthday treat for any diet. Do you have a favorite annual celebratory treat that needs converting or replacing, to be safe and healthy for you and/or loved ones? Do share and I'd love to brainstorm with you about substitutions and new ideas. And check out RealSustenance.com for more great ideas.

Playing around with cupcakes and my Gerbera daisy plate

It was a treat to find my Gerbera daisy plant blooming on my birthday.
I thought it didn't make it through the late ice storm we had,
but it's got two beautfiul red flowers on it now!

Another birthday, another year of life and many things to be thankful for. Every year I am a little surprised at how different a birthday is as an adult. I don't know why it's taking me such a long time to adapt to that difference from childhood. But it is better, especially when you have a best friend/spouse and a precious baby girl to spend it with. 28 years of life accomplished, and so many more to come!

Wednesday, May 30

[Coconut Milk] Ice Cream!!!

We did it. We finally made homemade ice cream. My mom and dad got us the ice cream maker attachment for our KitchenAid mixer as a housewarming gift - almost FOUR years ago. Hey, at least we're finally using it right?? :)

Do you know what my #1 favorite thing is about this ice cream? The price. I would go to the grocery store and buy a teeny tiny PINT of Coconut Bliss for $5.49 plus tax. And that was the cheapest price around! This ice cream makes TWO PINTS and it cost me less than $3. Two cans of coconut milk at $1.48 each, plus a few items you probably have in the pantry.
And the taste and texture were absolute perfection! We made our first batch for a Mother's Day dessert - coconut milk ice cream with fresh fruit, yum! The next week we made a peppermint chocolate-chip version - still gluten-, dairy-, egg- and soy-free, and very very tasty!

Coconut ice cream with fresh mango and strawberries


Homemade Coconut Ice Cream


What you need:

2 cans all-natural, full-fat coconut milk (I love Taste Nirvana!)
2 TB tapioca starch
1 tsp alcohol-free vanilla
1/2 cup shredded coconut

For Mint Chocolate Chip version:
(1/2 tsp gluten-free peppermint extract)
(1/4 to 1/2 cup dairy-free, soy-free mini chocolate chips - Enjoy Life Mini Chips)

What you do:

First, freeze the part of your ice cream maker that needs to be frozen ahead of time. Don't miss this step, or you'll be so disappointed that you won't have ice cream until the next day. How do I know that... ;)

Open cans of coconut milk and pour 1/4 cup into a small bowl. Measure out tapioca starch and whisk into small bowl of coconut milk, until blended together.
Pour the remaining coconut milk into a medium saucepan and heat over medium heat. Stir occasionally, until milk begins to boil. Whisk in the starch/milk mixture and continue stirring until whole pot of milk is thickened and smooth - this will take one to two minutes.
Remove saucepan from heat. Stir in vanilla (Mint Chocolate Chip variation: add peppermint here and mix). Pour into a heat-proof container and cover; put into the refrigerator to cool down and chill for four hours.

After ice cream "base" liquid is chilled (wait at least four hours), remove from refrigerator and get your ice cream maker ready.
According to your ice cream maker's instructions, start making ice cream! As far as I know, all ice cream makers are about the same - freeze the container for 18-24 hours, mix and chill your liquid base for at least 4 hours, then set up the appliance.
Turn it on first, pour your liquid base into the frozen container next, and let it mix and freeze and turn to ice cream - for about twenty minutes.

Ice cream in the making
You'll know it is ready because it will be fluffy and thick and creamy, like the best ice cream you've ever had - not like the smashed, packed ice-crystallized stuff at the store. I was so impressed!


*If you are making the Mint Chocolate Chip version, add the chocolate chips after twenty minutes and let them get mixed in well. It will cause a few "bumps" and "crunches" as the container continues to spin, but if you use the Enjoy Life Mini Chips, it shouldn't cause a problem.

Mint Chocolate Chip ice cream ready to go in the freezer in glass SnapWare
Try making this delicious dessert this summer, and come back here to tell me what flavor you tried. The flavor possibilities are endless! A little prep time, creativity, and you'll have homemade ice cream for just a few dollars and completely free of any chemicals, thickeners, or allergens! You won't regret it :)

Wednesday, March 28

Paleo "Apple Pie"

I deserved a treat today!
It was a long, uncomfortable weekend.
I visited an allergist on Friday, where I almost walked out twice because of the "culture clash" as the doctor described it. Note to Doctor, when you start off an appointment by saying that you "don't believe leaky gut syndrome exists," this really alienates your patients that attempt to be informed. Just because something isn't written up in your favorite medical journal, does not make it quack science.
I struggle with the resistance in allopathic medicine to listen to theories about the root of disease; I would think that a physician, someone who works in a helping profession, would at least be mildly curious about what is truly helping people (i.e. treating autoimmune and allergies by treating leaky gut with the Paleo diet, SCD, going grain-free, etc.)! OH well. I left on a good note, feeling like I planted a seed of awareness, and the doctor seemed to be mildly intrigued that my inflammatory and autoimmune conditions improved when I eliminated the reactive foods on my IgG panel two years ago. That's all you can do sometimes, is plant a seed. Much better than walking out and giving up :)

The doctor did run two allergy panel skin tests for IgE reactions. As far as the results are concerned, I only have true allergies to grass, weeds, cats and milk, and less significantly to peanuts, almonds and soy. 
Unfortunately my body says otherwise.
What seems to have happened is that I absorbed all of the substances that they injected me with for the test (wheat, milk, egg, soy, pollens, nuts, and so on...) and because I have IgG allergies to many of those things, it's been a miserable time.
I am finally coming out of the allergy fog, and feeling less stiff and enthesitis-y. 
Yes, I just made up a word  :) 
I finally felt a bit like myself again!

So I made Crock Pot applesauce. 
And then I made Paleo "Apple Pies!" 
(I suppose by composition, they are more like cobbler, but whatever.)
 These treats are something I came up with during our first month of eating Paleo, and I think you'll enjoy them quite a bit!


What you need:
First-
5-10 pounds peeled, cored, sliced and washed apples
1/2 cup filtered water
2+ tablespoons cinnamon (+ according to taste)

Later- 
almond meal
coconut cream (sold in cans or small aseptic boxes)

What you do:
First- make a batch of applesauce. This is easy to do!
You just need to adjust the size of your slow cooker and the cooking time depending upon how many apples you are working with.
For ideal cooking, the insert will be at least 1/2 full.
I used my six quart Cuisinart slow cooker and it was about 4/5 full of Braeburn apple slices.
I use a nifty apple corer/peeler/slicer gadget that we got as a wedding gift, and it makes this whole process fun and fast. I highly recommend getting one if you make applesauce often!

Fill an appropriately sized slow cooker insert with the clean, peeled pieces of apple.
Sprinkle cinnamon over the apples.
Pour water over everything.
Put the lid on, set to "Low" heat and let cook until apples are breaking down, water has absorbed and cooked out, and applesauce is the consistency you desire.
(I let mine go for six hours.)
Depending upon how long you cook it and how small your apple pieces were to begin with, you may want to mush applesauce with a potato masher to get a smooth texture.
(I leave mine as is; it's so soft the small chunks don't seem to matter.)

First, dish up some applesauce for yourself and whoever is with you, and make some "pies." 
Then store the rest: spoon applesauce into sterilized glass jars, let cool in the refrigerator overnight, and freeze. 
With just fifteen minutes of preparation and six hours of cook time, I have six jars full of fresh, homemade applesauce.
The ingredients cost under $5!
Making things homemade is a great way to save money and ensure your family is eating good food
without creepy preservatives or other undesirables.

For "pies"-
Spoon approximately one cup of applesauce into serving bowls. Scoop on one or two spoonfuls of coconut cream in each bowl, and sprinkle almond meal over the top. Coconut cream has a strong coconut flavor on its own, but when you stir everything together and take a bite, it really tastes like warm apple pie with a touch of cool whipped cream!
These are delicious.
Enjoy!

Thursday, March 22

"Samoa" Cookies

A few months back I saw a great recipe at beautiful Real Sustenance blogGluten Free Samoa Cookies. (Grain/Egg/Corn/Soy/Dairy/Refined Sugar Free). Samoa cookies have always been my favorite, dating back to my year as a Junior Girl Scout. If you've ever read the label though, like me, you know that they are not very good for you. So I was very excited to find Brittany's recipe over at Real Sustenance, and saved it for a later date. Check out the recipe here.

I finally had the chance to make these cookies yesterday with a good friend. They weren't exactly like original Samoa, but they were EXCELLENT cookies, even compared with traditional cookies made with wheat flour and butter. We used spring themed cookie cutters - a flower, a tulip and butterfly. If I get the chance to make these again some day, I will just keep it simple with a circle cutter, because the shapes get covered by the blobs of caramel and you can't tell what they are underneath the delicious toppings. The shapes made it more festive though, so I'm still glad we did that.

The caramel is so delicious, the fact that you can't tell these are tulips, flowers and butterflies doesn't really matter!

First, I used Bob's Red Mill Gluten Free Shortbread mix to make the base cookies. It was one of the last grain items left in my kitchen, so it needed to be used up. This made my cookies gluten free but not grain free. However, they are free of soy, dairy and egg.
I made the shortbread cookies with substitutions for the ingredients called for on the recipe on the bag, which called for butter, water and an egg yolk.
I used the new Spectrum butter flavored palm shortening in place of butter or soybean oil shortening, and instead of egg yolk I mixed a heaping tablespoon of golden flax meal with 1/8 cup warm water, into a yolky-textured gel. I had to add water throughout mixing the dough, to get it to the right texture to roll out flat, but they turned out very well - if a bit hard. The golden flecks of flax meal in the white cookies looks pretty.

Once the shortbread cookies were cooled, I made the caramel. The original recipe had several options for each ingredient - what a blessing when you have dietary restrictions! I made it with the following:
  • 3/4 cup organic virgin coconut oil
  • 1 1/4 cup brown sugar (another item in the small "gotta get rid of this" section of my cupboard!)
  • 1/4 cup agave
  • half can of canned, preservative-free coconut milk (I LOVE Taste Nirvana!)


I was surprised at how long it took to get the caramel past 200 degrees; it was a stubborn pot that didn't want to boil! But finally after about 30 minutes, the candy thermometer was creeping up and we had our caramel. It was delicious! I think it's pretty neat that you can make caramel dairy-free, and I want to make it again for a special occasion to top coconut ice cream.

For the chocolate topping, we used Enjoy Life allergen-free mini chocolate chips (those things are AWESOME!) and my unsweetened coconut flakes were organic, small shreds from the bulk section of Whole Foods that we toasted on parchment paper in the oven for about 5 minutes

A tulip


It was definitely worth it to finally try out this recipe. I would love to repeat it every year around Girl Scout Cookie time, so I feel less left out. It's good to treat yourself once in a while :)
Happy Spring! Are you as thrilled as I am that it's finally here?!


Sunday, March 18

[Nutritious] Chocolate Banana Drink

This afternoon I was watching TV and got stuck on the Ninja Kitchen System infomercial. Isn't it true that even if you have NO need for a product, an infomercial can sell you anything if you don't hang on to your self control and head sense? Translation: Even though I own a nice quality Kitchen Aid blender, food processor, mixer, and Jack Lalanne Juicer, a few minutes watching the wonders of the Ninja KS, and I thought I needed it. What can I say? Anything cooking-related is my weakness. Thankfully I came to my senses, and realized I could make a delicious afternoon treat (like they were making on TV) without spending any money, using what I already own.

So I hopped into the kitchen and got to it. This was my inspiration today:
When we were kids, occasionally my mom made us this super yummy afternoon snack that we called "Chocolate Banana Drink." It consisted of ice, bananas, and chocolate pudding mix. Simple, sugary, and delicious. This afternoon I wanted something that tasted like that, but chocolate pudding mix is full of junk and not something I keep around my pantry (anymore). So I adapted my own [gluten-free, dairy-free, soy-free, sugar-free, Paleoish] recipe, and in under ten minutes we were all enjoying a delicious, chocolate frappe-style dessert drink. Here's the recipe:

[Nutritious] Chocolate Banana Drink!

What you need:
2 frozen bananas, broken into smaller pieces
handful (about 1 cup) frozen, torn spinach and kale leaves
1/2 cup coconut milk (I used Silk PureCoconut original)
1-2 TB cocoa powder (add more/less to taste)
1 TB golden flax meal

Optional:
3 chunks frozen pear
4 ice cubes
1/2 cup water

What you do:
Put bananas, greens, coconut milk and cocoa powder into blend and puree until it reaches the right consistency. I had to add 1/2 cup water to help it along, then it was too runny, so I added the frozen pear and ice cubes, and more cocoa powder and it became the perfect chocolately frappe consistency. 

I enjoyed my treat so fast, only afterward did I realize I should share this on the blog, and there was nothing left to photograph! My hubs had a tiny bit left:


Make this drink and this is what you'll be seeing -or rather NOT seeing- in a matter of minutes  :)


Wednesday, February 15

Apple Cider Baked Doughnuts!

This morning was one of those special ones - I got up and the sun was shining, my body wasn't flaring, and I was ready to take on something new! (Don't you love that?) So, I baked some doughnuts. And oh my goodness, are they good. Stay with me here...

A few days ago I came across a recipe for Apple Cider Paleo Doughnuts over at Paleo Spirit. With a few modifications, I soon had six gluten-free, dairy-free, grain-free, egg-free, soy-free, Paleo, (vegan,) Apple Cider doughnuts on my counter top.

Now there's only one. And I'm trying to save it for my hubby. But I don't know if I will make it!

What a wonderful sight!


Apple Cider Baked Doughnuts
adapted from Paleo Spirit

What you need:

1/2 cup coconut flour
1 teaspoon cinnamon
1/2 teaspoon baking soda
pinch of fine sea salt
2 tablespoons maple syrup
2 tablespoons melted coconut oil
2/3 cup warmed apple cider (I used a locally produced unsweetened, unfiltered, fresh pressed apple juice)

For the sweet sprinkle topping:
1/4 cup sucanat
1 tablespoon cinnamon

What to do:

Preheat oven to 350 degrees F.
Prepare your doughnut pan. I used canola oil spray, but I don't condone this for regular use! Next time I'm going to grease the wells with coconut oil and see how that works.

First, make your egg substitute. Put 3 tablespoons of flax meal in a bowl, cover with 1/3 cup warm to hot water. Whisk with a fork and let sit to gel.
Another option is to use homemade cinnamon applesauce* - it would add the binding capabilities of egg, plus more apple and cinnamon flavor! (I'm doing this next time!)

Next, get out two mixing bowls. In one bowl, use a fork to mix together the coconut flour, cinnamon, baking soda and sea salt. In the other bowl, stir together maple syrup, melted coconut oil, and egg substitute. Add the dry ingredients to the liquids and fold together. Pour in the warm apple cider and mix well.

Spoon dough into the doughnut wells, enough to be level with the pan surface. I used a full size doughnut pan with 6 wells, and the amount of dough was exactly perfect to fill each one to the top. Put pan into preheated oven. After 15 minutes have passed, check on the doughnuts. They will be soft to the touch even when done, but when they are ready, the edges will be browned and when you tap the dough with your finger, no batter will come off. My doughnuts were ready after 20 minutes of bake time.

Let sit to cool and "firm up" for a bit, 10 to 20 minutes. I had to feed my little one, and when I returned after 20 minutes the doughnuts were spongey-soft but firm enough that most of them came out of the pan in one piece when I turned it over onto a cutting board. 

For the finishing touch, use a silicone/pastry brush to moisten the doughnut tops and sides with melted coconut oil, and sprinkle on a mixture of sucanat (or coconut sugar, or whatever pretty crystallized sweetener you like) and cinnamon.

These doughnuts are very soft, almost spongey, and remained that way all day. Absolutely no problems with coconut flour-drying out issues here! They have a moist coffee-cake-like texture, but they are fragile; don't expect to pick one up and eat it like a "crap-filled Hostess" doughnut (ok, that quote was from my husband just now). My taste tester said they remind her of old fashioned Dunkin Donuts - the cake style ones that had cinnamon sugar topping. If you are comparing these to that kind, I'd say they are as good if not better! I’ll play around with it some more to see if I can get them firmer (maybe less liquid?), but the taste is in need of NO upgrades! Another day, another reason to be thankful for the food we're meant to eat! :)

Monday, August 15

Gluten-Free Blackberry Crisp

I haven't been cooking or baking much (actually, almost NEVER) during this pregnancy, which is why it has been months since I posted a recipe here. I actually baked something over the weekend, and it felt like a betrayal to not post about it! So, here you go:

We feel blessed to have an abundance of a noxious/invasive weed in our backyard and alleyway. Blessed by weeds, you say? Well yes, because for about two or three weeks each summer, these weeds happen to have huge, juicy, sweet blackberries hanging off their pokey vines!


It's blackberry season, and we have finally had enough sun and heat to ripen a fair amount of berries. It has been on my mental radar almost every day to get outside and check the blackberries, so we're sure not to miss the crop. Last year we waited and waited for them to ripen, and they finally did over a few days when we were busy - and then it rained, and by the time we got outside to pick some berries, every last one was spoiled. So this year it's been a priority. On Saturday my mom and I got out there in the afternoon sun and picked two overflowing containers full. Yes!

We came in with about nine cups. Oh, here's my berry picking tip for you. See, I grew up berry-picking into plastic four-cup measuring cups, and still keep up the tradition. They work great - they're unbreakable if dropped, and it's easy to know just by a quick glance when you've got enough for a pie (usually four cups are needed)! I've been in the mood for baked goods and baking, which is a change from the past nine months. I really want to bake a blackberry pie before the summer is over, but I haven't the energy right now to play around with homemade gluten-free crust. So I thought, maybe a cobbler/crisp type of concoction would be yummy and much easier?
After we all had dinner (one of my favorite dishes that I'll have to share with you sometime: Soy Sauce Chicken), I searched online and quickly found a recipe for Gluten-Free Blackberry Crisp. With help from Hubs and Mom, we threw it together in ten minutes, and put it in the oven. [Sidenote: Isn't the worst part of baking something with berries just waiting for it to cool after you pull it out of the oven?] Well, we made it through the cooling off period, and each of us enjoyed a little bowl of Tillamook French Vanilla Ice Cream with warm GF Blackberry Crisp on top. YUM!!!

Here's the recipe. Credit for the original recipe goes to GlutenFreeDreaming.com, and the modifications are my own.


Gluten-Free Blackberry Crisp

Preheat oven to 375 degrees. Grease a 13x9 inch pan with coconut oil.

In a medium bowl, mix 8 cups blackberries, 1/2 cup Sucanat or raw/turbinado sugar, 1/3 cup tapioca or potato starch, a sprinkle of cinnamon to taste, and 2 TB lemon juice. You don't have to mash the berries, but some will get that way as you stir -especially if they are very ripe! Pour into the prepared baking dish.

In another medium bowl, mix 1 1/2 cup gluten-free oats, 3/4 cup packed brown sugar, 1/4 cup tapioca or potato starch, 1/4 cup brown rice flour, and a sprinkle of cinnamon and nutmeg to taste (I used approximately 1/2 tsp cinnamon and 1/4 tsp nutmeg). Then add 1/2 cup softened butter, cutting in with a pastry blender or using your clean hands, until mixture is blended and resembles coarse crumbs. Sprinkle evenly over the top of the blackberries waiting in baking pan.

Bake in 375 degree oven for 35 minutes until topping is golden brown and berries are bubbling, and if you want to crisp the topping more, broil (on LOW setting, just in case you forget about it!) for a few minutes. Let cool for at least twenty minutes, using a fan if you're desperate to enjoy dessert and can't wait long. Spoon over vanilla ice cream for a special treat! Enjoy.

Now if I can just get a GF pie crust together, there are some huge ripe berries outside just begging to be put in a pie... ;)

Friday, May 13

TJ's Picks, including a Delicious Dairy-Free Dessert!

We got a fun little surprise in the mail on Monday - my mom surprised us with a gift card to Trader Joe's, so we could buy some "goodies" while we are remodeling! So earlier this week Hubs and I headed over there. It was fun! We did a quick but not rushed go-round of the store and filled a basket with an assortment of things, and I got some things to stash away on my new "treat shelf" - it's on the top shelf of the farthest kitchen cupboard, so I have to stretch and reach to get anything down. That's my justification for having treats at all - I have to work a little to get to 'em.

We came home with a full bag of items, including Trader Joe's Gluten Free Ginger Snaps

Black Licorice Scottie Dog gummies

Freeze Dried Strawberries, to snack on or add to cereal

and very tasty Gluten Free (Maple Cranberry) Granola!

(By the way, Trader Joe's has some handy lists available on their website that list their products that fit specific dietary needs, including a five page list of all their gluten free foods. Pretty handy to prevent aimless wandering around the store reading labels for hours!)

Before we went to the checkout, we went through the freezer section quickly (not typically too many options for me there) and I saw something wonderful: Dairy-Free Mochi Ice Cream!

If you've ever had the "regular" Mochi Ice Cream that comes in flavors like green tea, strawberry and chocolate, you know it's good. Chewy rice cake outside with cool, sweet ice cream inside. Well, God Bless them, they have created a dairy-free version made with coconut milk! For less than $4, you get a box of six mochi cakes: two mango, two chocolate, and two coconut flavor. I just had a chocolate one, and it was delightful! If you are allergic to dairy or making the wise choice to cut back on it, try these little numbers. Elegant enough for a couples dinner party dessert, yet simple enough to enjoy while watching TV with your feet up on a Friday night. If you try these, leave a comment letting me know how you like them. I think these are my new favorite special treat :)

Saturday, April 30

GF Lemon Cornmeal Cake

I made this delicious lemon cornmeal bundt cake for our open house two years ago, and it was very good. I found the recipe in a spring issue of Women's Day, and it fit in perfectly with the chicken taco buffet and cilantro lime rice we served. I didn't have any food allergies then (weird I know) and didn't think anything of the wheat flour, butter and eggs in it.

Well, I remembered this cake last week, tracked down the recipe, and decided to see if it could be pulled off in a gluten free version. While using Google to find the original recipe from Women's Day, I also happily stumbled upon someone's gluten free suggestion for the same recipe (she's got gorgeous pictures of the finished bundt cake there as well)!

I am signed up to bring dessert to our small group tomorrow, and I think the lemon and cornmeal flavors of this cake will fit nicely with the BBQ chicken lunch our hosts are cooking. And imagine, I can have a piece with everyone else when it's time for dessert! It's the simple things that I appreciate...
We don't normally keep sugar in the house, but I had some leftover from baking gluten-free sugar cookies with a friend. I had to buy a little bit more so I could bake both a test cake for home and a cake for small group. I hate buying sugar -I'd go so far as to say it makes me feel dirty to do it! But I tell myself that ONCE IN A WHILE is okay. Now is not a good time for experimenting with stevia, maple syrup or honey to try and get the right flavor for this cake and glaze.

As with all gluten free recipes, this needed testing before I share it with gluten-indulgent friends. So this morning I halved the recipe and baked an eight inch round. I had no issues with it at all, it baked up perfectly in thirty minutes! I just tried a piece, and it's delicious! I'm sure the butter, eggs and sugar have a lot to do with that. ;) (At least it's gluten free!) It's soft, a little crumbly, tangy and sweet. The glaze hardens and makes a nice sugary crunch. A must-have for a spring or summer tea party, baby shower or BBQ. Put it in a glass cake dome or on a lovely pedestal. Perfection!

Here's the recipe for an eight inch round. Double it and proceed with care to attempt the full Bundt cake - I don't know how it would turn out in a gluten free form.

Gluten Free Lemon Cornmeal Cake
Grease an eight-inch cake pan with coconut oil and dust with rice flour.
Preheat oven to 325 degrees.

In a medium bowl, whisk together:
1 cup rice flour
1/4 cup corn starch
1/2 tsp xanthan gum

Add:
1/4 cup cornmeal
1 tsp baking powder
1/4 tsp baking soda
1/4 tsp salt (or less if you watch your sodium intake- I used just a sprinkle)

Whisk together well and set aside.

In the bowl of your standing mixer, beat together the following on medium speed until light and fluffy:
1 stick softened unsalted butter
Between 3/4 and 1 cup sugar
Zest of 1 lemon
Juice of 1 lemon

Add 2 omega-3 organic eggs and blend together.
With mixer on low, alternately beat in dry ingredients and 1/2 cup plain nonfat yogurt which you have stirred smooth. Mix until batter is smooth, but do not overmix (never overmix gluten-free batters).
Batter will be thick. Scrape into prepared cake pan and smooth with spatula/spoon.

Bake for thirty minutes, until toothpick inserted in center comes out clean. Place pan on wire rack to cool.

After five minutes, remove cake from pan and place atop a square of parchment paper. To make the glaze, whisk together 1/2 cup sugar and juice of 1 lemon in a small bowl. Sugar won't dissolve completely. Pour/brush glaze over the hot cake until much of it is absorbed.

Let cool and rest for several hours, then enjoy! Serve in thin slices.
To keep overnight or longer, make sure cake is covered well. It tends to dry out quickly.

---------------------------------------------
Our camera is not working right now. We are hoping to be gifted a new one before Baby Girl arrives, because pictures of our newborn will be kind of a necessity! But I took a few pics with my phone, just for fun.

The cake, ready to go in the oven - the batter is quite thick as the recipe states:

Hot out of the oven before glazing:

Glazed and cooled and missing a piece (now it's missing two!):

Thursday, March 3

Pumpkin Pudding Bars (gluten-free, vegan)

Oooh, yes please! This Pumpkin delight from Stephanie's Hope for Healing blog looks too good to pass up! I only have canned Libby Pumpkin right now, but that may have to do. I love the use of pumpkin all year round, because it's way too nutritious and delicious to limit to a short fall cooking and baking season :)

Pumpkin Pudding Bars (gluten-free, vegan)

Tuesday, February 1

GF Vegan Chocolate Pudding!

I feel like I haven't posted in months! I have been sick and living the "treading-water" life day to day, just trying to keep everything above water. It was definitely time to update, so here is a new post with a great recipe...

I have been dealing with some UC flare issues for the past month or so, and craving chocolate pudding all the time. I love pudding. It doesn't require much digestion and it's such a friendly dessert (if there is such a thing?). I love slurping it up when I'm feeling crummy and my guts are angry. Chocolate pudding is my favorite, and I have made both cook 'n' serve and instant versions from the box for years, but I've always wanted to try making pudding from scratch. The ingredients in the box are not always pleasant to read, particularly when you're looking at the most popular pudding brand in America (not to name any names... Bill Cosby used to do commercials for them...). Even the "organic" versions of box pudding can be frightening. So I took it upon myself to find a pudding recipe I can indulge in that is free of all my allergens. I wasn't sure if I'd find anything without eggs, because they are a major ingredient of classic homemade puddings and custards. But this recipe turned up, I gave it a whirl, and I've now made two separate (eight servings each) batches. -Actually, I made the mix, and my Hubby cooked both batches! How could I forget?

A few notes:
  • To cook, we used canned coconut milk from our local Asian market. It gives it a nice chocolate coconut flavor, and thickens much better than rice milk (nothing worse than expecting pudding  and ending up with a runny soup!)
  • The Dutch cocoa gives the pudding a rich, chocolatey flavor that no box mix ever has. 
  • If you are very gluten-sensitive, make sure to use certified GF cocoa powder and powdered sugar.
  • I sprinkle my powdered probiotic on top of every bowl of pudding right before eating, and stir it in well. I know it helps my guts!
Give it a try and let me know what you think! Sorry I don't have pictures -- it didn't last long enough to snap any.  :)


GF Vegan Chocolate Pudding
Makes two batches of 8 x 1/2-cup servings (16 total)

My favorite part about this is that I know exactly what is going into the mix:
  • 1 cup Dutch process unsweetened cocoa powder
  • 1/2 cup cornstarch
  • 1 3/4 - 2 cups powdered sugar (use 2 cups if you like your pudding really sweet)
  • 1 teaspoon salt
Place all above ingredients in a large bowl and whisk to thoroughly blend. Set aside until you're ready to make pudding. (Sidenote: I think this would make a great gift for a food-allergic friend. Pour the mix into one or two clean, dry Mason jars, tie on some bows, put them in a basket with the necessary number of cans of coconut milk, the recipe, and a new spoon or spatula - voila! How fun would that be?!)
    For cooking (now or later):
    •  4 cups canned coconut milk OR your favorite dairy-free milk substitute
    • 1 1/2 tsp vanilla
    To prepare pudding:
    In a medium saucepan, add 1 3/4 cups dry chocolate pudding mix and 4 cups milk. Whisk to dissolve the pudding mix. Heat on medium until the mixture bubbles and begins to boil, whisking constantly to prevent burning. Contine to cook for about 2 minutes until the pudding is smooth and thickened. Remove from heat. Stir in vanilla and cool before serving (or enjoy warm - sometimes it really hits the spot!). Makes eight 1/2 cup servings.

    ** Mix makes two recipes of pudding, or sixteen 1/2 cup servings. **

    Friday, December 24

    Christmas Eve Caramel Corn

    I am on a roll! I feel so light and joyous this Christmas Eve, it is WONDERFUL! I have completed Reindeer Chex Mix and filled all six tins for the neighbors...


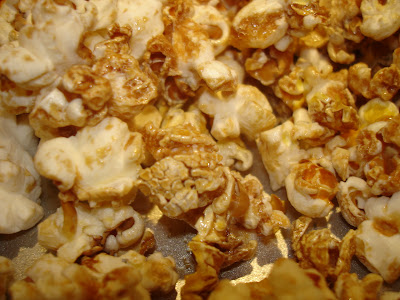
    Even better, I finally made a batch of another recipe I earmarked a few weeks ago: The Whole Life Nutrition Kitchen's Maple Caramel Corn. Let me just tell you - it is EASY, FAST, and DELICIOUS! (Yes, that really did need three capitalized words!) You must try the recipe - I can't get over the fact that it is entirely GFCF egg-free and soy-free, and the sugar (maple syrup, grade B) is natural, unprocessed, and minimally problem-causing for me. *Note: The recipe author is not kidding, you need a REALLY BIG bowl or two typical "large size" mixing bowls to mix it up. This was the first time I've made popcorn on the stove as well, and I can see this being a super fun activity for kids (with supervision of course) and anyone young at heart like me. Try it, ASAP! :)

    Maple Caramel Corn

    Serve a large bowl of this tasty popcorn at your holiday party. It also makes a great gift for a teacher! If you double the recipe then make it in batches. Popping one cup of popcorn will nearly fill an 8-quart stockpot!

    2 to 3 tablespoons virgin coconut oil
    1/4 teaspoon sea salt
    1 cup organic popcorn kernels

    1/2 cup virgin coconut oil or butter
    1 cup grade B maple syrup
    few dashes sea salt

    Preheat oven to 325 degrees F.
    Heat an 8-quart stockpot over high heat for a minute or so. Add oil and salt, then popcorn. Cover and cook for a few minutes, moving the pot vigorously, until the popping has subsided. Then quickly remove from heat to prevent burning and pour popcorn into two large bowls (or one really large bowl if you own one)!
    In a small to medium saucepan heat the coconut oil or butter, maple syrup, and a few dashes sea salt over medium heat. Once small bubbles form begin timing for 4 to 5 minutes. Cook, whisking occasionally until thickened and foamy. Quickly pour over popcorn in bowls and toss together using two large spoons. Spread into two shallow baking pans or cookie sheets and place in the oven.
    Bake for 10 minutes stirring half way through. Let cool completely. Caramel corn will crisp up as it cools. Store in a tightly sealed container once completely cooled to keep it crisp.
     Source: www.NourishingMeals.com

    My first batch turned out perfect!
    Never thought I'd call popcorn "beautiful," but this really is!
    Two whole (LARGE) cookie sheets FULL!


    Clean applesauce jars and some Christmas scrapbook paper  made beautiful gifts of caramel corn for best friends

    Reindeer Corn Chex Mix

    I adapted this recipe from one of the Chex.com recipes that was written for an autumn theme. I made it in about ten minutes and it's currently cooling and setting up - it looks SO good, I wish I could indulge in it, but the ingredients of white chocolate chips are NOT GFCF (I avoid the pretzels as well)! That just means more to give away!I can't wait to package it all in little Christmas tins (which I purchased for $1 each!) and deliver to the neighbors :)

    Emily's Reindeer Chex Mix


    Ingredients
    16 oz white chocolate chips
    4 cups Rice Chex cereal
    4 cups Corn Chex cereal
    4 cups pretzels
    2 cups Reindeer Corn
    1/2 cup+ Cinnamon Imperials/"Red Hots"


    Red Hots and Reindeer Corn

    Pour the white chocolate chips in a large microwaveable bowl. Melt by heating in the microwave for two minutes, stirring every 30 seconds. Add in the cereal and pretzels, and stir gently until coated with chocolate. Then add in candies. Spread mix onto waxed paper on a cool countertop to set. Break apart into small pieces and package as you like.
    Delicious! (I snuck a bite...or two.)

    Looks good!

    Packaging for the neighbors

    This says Merry Christmas like no other treat!

    Saturday, December 4

    All Day I Dream About Food: Cranberry Bliss Bars (Low Carb and Gluten Free)

    OOOOoooooohhhhh! I saw this post on a blog I just discovered ("All Day I Dream About Food" [what normal person doesn't?!]) and decided to dump my allergies and make these before Christmas. (At least they are low sugar and gluten free!) I remember having one or two Cranberry Bliss Bars at Starbucks before my allergies came to stay. They are divine, just enough of a treat to make a Christmas party rich. Ok, I officially need to stop blogging recipes and get in the kitchen to put some to test. Happy Saturday all! :)

    Carolyn's beautiful photo of her gorgeous Bliss Bars - WOW!

    All Day I Dream About Food: Cranberry Bliss Bars (Low Carb and Gluten Free): "It likely won't win me any friends here in the Boston area to admit this, but I am not a fan of Dunkin' Donuts. Around these parts, people ..."